1.1-1.7
Identify the function of capturing equipment

Transferring our film pieces was the first step of this process, we used a USB cable to connect out camera up to the computer, and then moved the video files over into our clip bin. From there I selected the filmed clips up in Adobe Premier, comparing the footage, checking it fits well in frame, and syncing up the audio that we had recorded. We made several checks over on the display monitor of the equipment, changed a few colour settings and focus issues before we decided to go through the internal memory and delete what was no longer needed. I personally decided to use external audio to lay in across the video and link in with the ambience we filmed off the camera, at a lower volume so they play off each other.
Explain the reasons why materials are captured

Materials captured during the filming process all have a semblance of use, we use different microphones to capture different tones and pitches, all with its own specific used in terms of making the movie an environment in its self. We utilize a wide variety of shot types, from standard wide shot, to long, close up, panning, and zooming. Following this, we decided to use MP4 as our main file type after the editing process was complete, as it serves a nice balance for sound and video quality, and while being a high memory file type, it's not to much of a struggle for even a common computer to compile this type. We had also considered using .Avi files, .wmv.
Describe different formats of logs, explaining how they are used
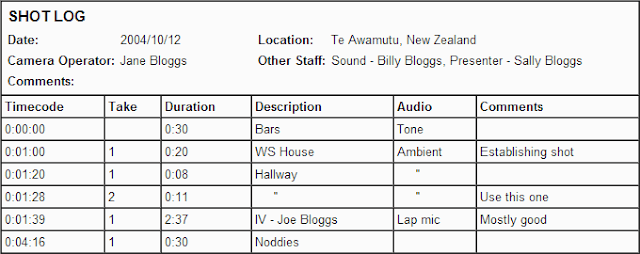
We logged our shooting specifically, making sure the shot lists showed every angle we planned to use, while the video log sheet went into detail following the aims of each shot, and what intentions it was to put across. I also used an audio log, to determine how what needs to be said, under what context, with specific timing and emotion during the capture. After this, we simply began the editing process, and slowly chipped away into the core of the video, moving into the more time consuming tasks to finish them earlier and with more effort.
Explain how to deal with copyright protected materials

Since we never used anything in the shooting that belonged to another company/artist/individual, we never had any issue following up with our own original content, but that doesn't mean this can't be an issue. It is easier in the long run to use public domain material, or if you plan to use something copyrighted, then attaining the relevant permissions, and giving the artist the credit for their (Minor.) Contribution to your production.
Explain how considerations of picture and sound levels, format, aspect ratio and compression differ when material is for on-line or off-line use


Resolution, aspect ratio, and sound all play a large role in the quality of the video, most people new to filming and the technical aspects tend to try making the files in really high resolutions, that sometimes their computers are unable to handle, leaving them with incomplete videos that may lose frames/pixels, or even the audio. These issues can cause a great deal of distortion in the filming process, especially when a person tries to couple high resolution intended for High Definition. These days, most computers are fitted with powerful enough equipment to compress and decompress videos, these Codecs are essential in turning raw visual data into the file formats we commonly see.(MP4 Avi WMV WebM Gif.) and turn them into viewable videos. With this being said, some choices are better than others, as unless you have a very powerful internet connection, uploading a video in MP4 format, with a 1080 x 1920 resolution, then this upload is going to take a good couple of hours, and that's assuming your computer managed to convert, compile, and finalise the video. Audio Codecs work much the same way, transferring raw data into audio supporting file formats.(.Wav, Mp3, Wma.) Some of these types (and ones not mentioned) Suffer from compression loss, and degradation over time, so it can be difficult locating what you need. Aspect ratio also needs to be considered, as this presses the viewing screen in or out, which on some televisions/monitors, can leave it to stretched, to narrow, or two sharp.
Identify problems involved in working with high definition materials

Time can be the biggest issue using footage captured in HD, as even a strong computer can take up to an hour of compiling the materials together, making the process take even longer on a lower end machine.
Explain how to capture standard definition materials onto high definition projects

This can be done by capturing your said footage native, and then during the editing process, setting the resolution to a higher standard (Which will extend compilation time.) And so fit into an aspect ratio of 4;3. This can sometimes have negative side affects, as frames can be lost during compilation, and sometimes sound as well.
2.1-2.7
Obtain relevant information on Source Materials and outcomes Required.
The more important things to watch for in terms of footage information, is making sure you know the following; The date, as it's always a good reference to any period of filming. You will need to know location, (Obvious reasons why.) Other good source information is what was used to capture it, and any additional equipment that was vital to the process. Keeping a record of blocking and positioning, and making sure you correlate all the files in some semblance of order that can be easily recognised (i.e renaming the file types.)
Identify and locate specified materials from written and verbal specifications
This can be a very crucial part of the process, as it's easier on the moment to write up your specifications on documents, rather than use a pc everywhere you go. This means that keeping these documents safe, and handing out copies to those who require them. It's also wise to keep a back up of everything either digitally or hard copy. Examples of these would be call sheets, release forms, shot angle sheets, equipment lists, and storyboards, this will all help filming and editing.
Log format changes required

I decided to use the most common video file, MP4, as the quality holds up, and it made it a great deal easier to manage, the file sizes were large, but not unusable. I set it to a resolution of 1280 x 720, and a standard aspect ratio of 4;3. I did this, because it still pushes the video into HD territory, while not putting to much pressure on the compilation process to avoid losing frames and sound. The aspect ratio was chosen, because this way it will suit all native televisions and monitors standard to PAL Colour Encoding.
Use aspect ratio or other format/standard conversion to rectify any problems
This is a tricky process, as if you are filming with multiple cameras, they are not always in sync with format and ratio, making sure they are is critical to the filming process, as otherwise you can get shots that look to spread or narrow, and sometimes, it may even cause you to have to start again. Making sure the equipment is in sync before you start always helps.
Provide sufficient supplies of working materials which are ready for use

When filming, it's good to make sure you have a list of everything you will need to accomplish your project timely and efficiently. Keeping a record of how you filmed your scenes and in what sequence is also a priority, it keeps order on the record, makes it easier to track what you are doing, and keeps you on point for seeing what you need to do next.
Implement arrangements for source materials in unsuitable formats to be transferred to the correct format.
Keeping track of the process and all aspects of it is vital, I have already talked about this in prior points, but this point is an example of what can happen if you leave it un-organised. You can quite easily find that you've accidentally been shooting in the wrong format, and sometimes, it could even be to late. To stop this, it's best to check your cameras regularly, and make a list of everything that needs to be done to keep a semblance of order.
Assess accurately the technical quality of source materials, taking any required remedial action
It's always a wise decision to playback your footage immediately, you need to be able to see whether the darkness compared to your camera monitor, is about the same level as any other display. You do this to save time, as you don't want to spend any longer than you have to getting a seen correctly blocked, acted, and filmed. It's good to check the foreground and back ground for any frame blurs or pixel loss, and making sure it's neither to exposed, or not exposed enough.
3.1-3.4
Select an appropriate resolution and storage location, ensuring there is sufficient storage available at the required resolution

For the purpose of being flexible I used 1280 x 720. This is still HD, and to my knowledge, suitable for all video colour encoders like PAL ect. The aspect was set to 4:3, as I didn't want to complicate the process and find that it only works well on my display and no where else. As this is my first time compiling in complex detail, I left the audio channels to be mono-stereo, as dolby and ultra stereo are catered towards surround sound, a feature I do not own in my home, so I would not be able to test it.
Ensure the line up is correct and to the required technical standards
Making sure the lenses are attached correctly, checking tripod screws are in place, making sure your equipment is concealed and protected. These are just some things that help ensure the correct usage of your equipment, sometimes even a loose wire can cause you to have to start again, so checking everything over is essential!
Take remedial action if equipment problems occur
During our equipment check, we discovered our second tripod was too thin. This meant that the weight of the camera forced it to go lopsided and this just wasn't a viable option, neither for our shooting, or for the safety of the equipment. We fixed this by replacing it with a more sturdy and dependable tripod.
Check and line up correctly picture and sound levels and audio format as required
Using headphones is recommended for monitoring and recording sound, as it blocks out external interference, and allows you to find the best audio focal points (I.E where the microphone is being directed.) If you are recording more than one piece of audio, it's easier to sync the two by playing with the volume to find the seconds where they cross over, and then sliding it into the right place, all whilst monitoring the audio levels to be sure they match up.
4.1-4.6
Input accurate information about source materials during capture
Since we collected this information digitally, we had all the details like time and file size already at our disposal, but to expand on the project we created shot lists, and in them we described the angles and meaning of the shot, and what the scene was about. Once we had finished this, we moved on to logging the data that was left, like location, who was there, what each member of the crew did, and how long it took to achieve all the needed frames.
Select correct timecode source during capture

Selecting a non drop frame time code made things a lot easier, as we could visually select the timing and match it up perfectly how we had envisioned it, this made it a clear solution to audio balancing. On top of that, we ran through several alternatives, just to see how it would stack up, we used two external mic's, and one of the microphones that was built into the camera it self to record our audio.
Select specified tracks accurately for capturing from source materials
I decided to keep a number of clips taken to match up and pair with the video footage, through out the editing process. Obviously for the purpose of the video, we never used any backing tracks, but I am leaving impressions of what we played around with in terms of audio, to show a greater understanding of the process, and how a good backing track can equally match the visuals to make the video have a completely different tone behind it.
Monitor the technical quality to identify any problems during the capturing process
During the process of filming the project, we monitored it closely, and even documented the shooting process with photographs as it went on. Over time we captured more and more images, showing the camera at work, it's settings, the microphone we were using, and who was involved. We did capture a lot about the location, just to be sure we captured all we needed for the process.
Store captured materials as required, ensuring that they are labelled accurately and unambiguously.

We stored all of our shots in the clip bin, which we kept on C:Desktop/Clipbin for easy access. From there we labelled each file according to what project it was, and what sequence. For example when we filmed the farm, we labelled the first clip 'The Farm Clip 1.' And so on. We matched this up with our shot list, so we would never forget which video had what shots and dialogue, providing we kept one nearby.
Maintain accurate records in the required format
For this, we kept all of the relevant paper documents, organised our files and folders with shooting in mind, and with compiling later down the line. When it came to the editing process, we used adobe premier, as it was openly available to our company. Using the tools to cut out shots that went on for to long, or layering over the timeline to match up cuts better. We synced the audio together using a set of headphone, whilst balancing the volume levels. Once we were happy with the procedure so far, I set it to compile the video in the settings I've specified, and waited for the finished product.
5.1-5.3
Check unclear or ambiguous requirements promptly with the relevant parties
The first requirement I ran into was obviously the camera and the equipment needed to operate and charge it, from there, we asked our manager to provide us with a computer that had Adobe Premier installed for the sake of being able to compile. Other pieces we need were microphones, tri-pods, carry-cases for everything, and sheets to log our progress and minor details so we did not forget. I spoke with John about the best way to approach the project was, what aspect ratio to use, what resolution would be best suitable, and even how the file should be saved specifically, to narrow down my wide range of options to fit the clients needs. We settled on an aspect ratio of 4:3, and a resolution of 1280 x 720, and saved the process as mp4.
Report technical quality problems to the relevant parties
We never ran into any immediate technical issues with the process, it was rather straight forward, but there can be many issues, if the machine cannot handle the process, or lacks the resource (I.E RAM, Disk space, Processor power.) To tackle the compilation, you can get information loss, resulting in the loss of frames, audio, and sometimes making the video completely unusable.
Report equipment problems to the relevant parties
During my time working on these projects, we managed to get through without any major equipment problems, nothing was dropped or damaged, there was one minor incident with a tri-pod being unfit to use, but barring that we came across no other obstacle in terms of equipment.
Identify the function of capturing equipment

Transferring our film pieces was the first step of this process, we used a USB cable to connect out camera up to the computer, and then moved the video files over into our clip bin. From there I selected the filmed clips up in Adobe Premier, comparing the footage, checking it fits well in frame, and syncing up the audio that we had recorded. We made several checks over on the display monitor of the equipment, changed a few colour settings and focus issues before we decided to go through the internal memory and delete what was no longer needed. I personally decided to use external audio to lay in across the video and link in with the ambience we filmed off the camera, at a lower volume so they play off each other.
Explain the reasons why materials are captured

Materials captured during the filming process all have a semblance of use, we use different microphones to capture different tones and pitches, all with its own specific used in terms of making the movie an environment in its self. We utilize a wide variety of shot types, from standard wide shot, to long, close up, panning, and zooming. Following this, we decided to use MP4 as our main file type after the editing process was complete, as it serves a nice balance for sound and video quality, and while being a high memory file type, it's not to much of a struggle for even a common computer to compile this type. We had also considered using .Avi files, .wmv.
Describe different formats of logs, explaining how they are used

We logged our shooting specifically, making sure the shot lists showed every angle we planned to use, while the video log sheet went into detail following the aims of each shot, and what intentions it was to put across. I also used an audio log, to determine how what needs to be said, under what context, with specific timing and emotion during the capture. After this, we simply began the editing process, and slowly chipped away into the core of the video, moving into the more time consuming tasks to finish them earlier and with more effort.
Explain how to deal with copyright protected materials

Since we never used anything in the shooting that belonged to another company/artist/individual, we never had any issue following up with our own original content, but that doesn't mean this can't be an issue. It is easier in the long run to use public domain material, or if you plan to use something copyrighted, then attaining the relevant permissions, and giving the artist the credit for their (Minor.) Contribution to your production.
Explain how considerations of picture and sound levels, format, aspect ratio and compression differ when material is for on-line or off-line use


Resolution, aspect ratio, and sound all play a large role in the quality of the video, most people new to filming and the technical aspects tend to try making the files in really high resolutions, that sometimes their computers are unable to handle, leaving them with incomplete videos that may lose frames/pixels, or even the audio. These issues can cause a great deal of distortion in the filming process, especially when a person tries to couple high resolution intended for High Definition. These days, most computers are fitted with powerful enough equipment to compress and decompress videos, these Codecs are essential in turning raw visual data into the file formats we commonly see.(MP4 Avi WMV WebM Gif.) and turn them into viewable videos. With this being said, some choices are better than others, as unless you have a very powerful internet connection, uploading a video in MP4 format, with a 1080 x 1920 resolution, then this upload is going to take a good couple of hours, and that's assuming your computer managed to convert, compile, and finalise the video. Audio Codecs work much the same way, transferring raw data into audio supporting file formats.(.Wav, Mp3, Wma.) Some of these types (and ones not mentioned) Suffer from compression loss, and degradation over time, so it can be difficult locating what you need. Aspect ratio also needs to be considered, as this presses the viewing screen in or out, which on some televisions/monitors, can leave it to stretched, to narrow, or two sharp.
Identify problems involved in working with high definition materials

Time can be the biggest issue using footage captured in HD, as even a strong computer can take up to an hour of compiling the materials together, making the process take even longer on a lower end machine.
Explain how to capture standard definition materials onto high definition projects

This can be done by capturing your said footage native, and then during the editing process, setting the resolution to a higher standard (Which will extend compilation time.) And so fit into an aspect ratio of 4;3. This can sometimes have negative side affects, as frames can be lost during compilation, and sometimes sound as well.
2.1-2.7
Obtain relevant information on Source Materials and outcomes Required.
The more important things to watch for in terms of footage information, is making sure you know the following; The date, as it's always a good reference to any period of filming. You will need to know location, (Obvious reasons why.) Other good source information is what was used to capture it, and any additional equipment that was vital to the process. Keeping a record of blocking and positioning, and making sure you correlate all the files in some semblance of order that can be easily recognised (i.e renaming the file types.)
Identify and locate specified materials from written and verbal specifications
This can be a very crucial part of the process, as it's easier on the moment to write up your specifications on documents, rather than use a pc everywhere you go. This means that keeping these documents safe, and handing out copies to those who require them. It's also wise to keep a back up of everything either digitally or hard copy. Examples of these would be call sheets, release forms, shot angle sheets, equipment lists, and storyboards, this will all help filming and editing.
Log format changes required

I decided to use the most common video file, MP4, as the quality holds up, and it made it a great deal easier to manage, the file sizes were large, but not unusable. I set it to a resolution of 1280 x 720, and a standard aspect ratio of 4;3. I did this, because it still pushes the video into HD territory, while not putting to much pressure on the compilation process to avoid losing frames and sound. The aspect ratio was chosen, because this way it will suit all native televisions and monitors standard to PAL Colour Encoding.
Use aspect ratio or other format/standard conversion to rectify any problems
This is a tricky process, as if you are filming with multiple cameras, they are not always in sync with format and ratio, making sure they are is critical to the filming process, as otherwise you can get shots that look to spread or narrow, and sometimes, it may even cause you to have to start again. Making sure the equipment is in sync before you start always helps.
Provide sufficient supplies of working materials which are ready for use

When filming, it's good to make sure you have a list of everything you will need to accomplish your project timely and efficiently. Keeping a record of how you filmed your scenes and in what sequence is also a priority, it keeps order on the record, makes it easier to track what you are doing, and keeps you on point for seeing what you need to do next.
Implement arrangements for source materials in unsuitable formats to be transferred to the correct format.
Keeping track of the process and all aspects of it is vital, I have already talked about this in prior points, but this point is an example of what can happen if you leave it un-organised. You can quite easily find that you've accidentally been shooting in the wrong format, and sometimes, it could even be to late. To stop this, it's best to check your cameras regularly, and make a list of everything that needs to be done to keep a semblance of order.
Assess accurately the technical quality of source materials, taking any required remedial action
It's always a wise decision to playback your footage immediately, you need to be able to see whether the darkness compared to your camera monitor, is about the same level as any other display. You do this to save time, as you don't want to spend any longer than you have to getting a seen correctly blocked, acted, and filmed. It's good to check the foreground and back ground for any frame blurs or pixel loss, and making sure it's neither to exposed, or not exposed enough.
3.1-3.4
Select an appropriate resolution and storage location, ensuring there is sufficient storage available at the required resolution

For the purpose of being flexible I used 1280 x 720. This is still HD, and to my knowledge, suitable for all video colour encoders like PAL ect. The aspect was set to 4:3, as I didn't want to complicate the process and find that it only works well on my display and no where else. As this is my first time compiling in complex detail, I left the audio channels to be mono-stereo, as dolby and ultra stereo are catered towards surround sound, a feature I do not own in my home, so I would not be able to test it.
Ensure the line up is correct and to the required technical standards
Making sure the lenses are attached correctly, checking tripod screws are in place, making sure your equipment is concealed and protected. These are just some things that help ensure the correct usage of your equipment, sometimes even a loose wire can cause you to have to start again, so checking everything over is essential!
Take remedial action if equipment problems occur
During our equipment check, we discovered our second tripod was too thin. This meant that the weight of the camera forced it to go lopsided and this just wasn't a viable option, neither for our shooting, or for the safety of the equipment. We fixed this by replacing it with a more sturdy and dependable tripod.
Check and line up correctly picture and sound levels and audio format as required
Using headphones is recommended for monitoring and recording sound, as it blocks out external interference, and allows you to find the best audio focal points (I.E where the microphone is being directed.) If you are recording more than one piece of audio, it's easier to sync the two by playing with the volume to find the seconds where they cross over, and then sliding it into the right place, all whilst monitoring the audio levels to be sure they match up.
4.1-4.6
Input accurate information about source materials during capture
Since we collected this information digitally, we had all the details like time and file size already at our disposal, but to expand on the project we created shot lists, and in them we described the angles and meaning of the shot, and what the scene was about. Once we had finished this, we moved on to logging the data that was left, like location, who was there, what each member of the crew did, and how long it took to achieve all the needed frames.
Select correct timecode source during capture

Selecting a non drop frame time code made things a lot easier, as we could visually select the timing and match it up perfectly how we had envisioned it, this made it a clear solution to audio balancing. On top of that, we ran through several alternatives, just to see how it would stack up, we used two external mic's, and one of the microphones that was built into the camera it self to record our audio.
Select specified tracks accurately for capturing from source materials
I decided to keep a number of clips taken to match up and pair with the video footage, through out the editing process. Obviously for the purpose of the video, we never used any backing tracks, but I am leaving impressions of what we played around with in terms of audio, to show a greater understanding of the process, and how a good backing track can equally match the visuals to make the video have a completely different tone behind it.
Monitor the technical quality to identify any problems during the capturing process
During the process of filming the project, we monitored it closely, and even documented the shooting process with photographs as it went on. Over time we captured more and more images, showing the camera at work, it's settings, the microphone we were using, and who was involved. We did capture a lot about the location, just to be sure we captured all we needed for the process.
Store captured materials as required, ensuring that they are labelled accurately and unambiguously.

We stored all of our shots in the clip bin, which we kept on C:Desktop/Clipbin for easy access. From there we labelled each file according to what project it was, and what sequence. For example when we filmed the farm, we labelled the first clip 'The Farm Clip 1.' And so on. We matched this up with our shot list, so we would never forget which video had what shots and dialogue, providing we kept one nearby.
Maintain accurate records in the required format
For this, we kept all of the relevant paper documents, organised our files and folders with shooting in mind, and with compiling later down the line. When it came to the editing process, we used adobe premier, as it was openly available to our company. Using the tools to cut out shots that went on for to long, or layering over the timeline to match up cuts better. We synced the audio together using a set of headphone, whilst balancing the volume levels. Once we were happy with the procedure so far, I set it to compile the video in the settings I've specified, and waited for the finished product.
5.1-5.3
Check unclear or ambiguous requirements promptly with the relevant parties
The first requirement I ran into was obviously the camera and the equipment needed to operate and charge it, from there, we asked our manager to provide us with a computer that had Adobe Premier installed for the sake of being able to compile. Other pieces we need were microphones, tri-pods, carry-cases for everything, and sheets to log our progress and minor details so we did not forget. I spoke with John about the best way to approach the project was, what aspect ratio to use, what resolution would be best suitable, and even how the file should be saved specifically, to narrow down my wide range of options to fit the clients needs. We settled on an aspect ratio of 4:3, and a resolution of 1280 x 720, and saved the process as mp4.
Report technical quality problems to the relevant parties
 |
| My Internet Speed |
We never ran into any immediate technical issues with the process, it was rather straight forward, but there can be many issues, if the machine cannot handle the process, or lacks the resource (I.E RAM, Disk space, Processor power.) To tackle the compilation, you can get information loss, resulting in the loss of frames, audio, and sometimes making the video completely unusable.
Report equipment problems to the relevant parties
During my time working on these projects, we managed to get through without any major equipment problems, nothing was dropped or damaged, there was one minor incident with a tri-pod being unfit to use, but barring that we came across no other obstacle in terms of equipment.
No comments:
Post a Comment